
According to Michael Feathers – “Any code that has no tests is a legacy code”. So as a developer it is your duty to avoid creating legacy code by using test-driven development (TDD).
There are many tools available for unit testing in ReactJS but we will be going through Enzyme and Jest.
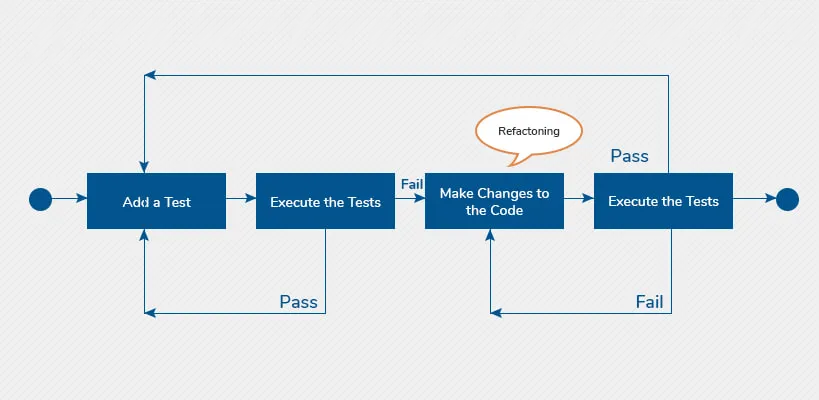
Test Driven Development (TDD) is a programming practice which enables developers to write code only if an automated test has failed thereby avoiding duplication of the code.
The primary aim of TDD is to write code which is clearer and bug-free.
As a developer, you need to write tests for every small functionality of the application. It is a cyclic process and each cycle starts by writing a unit test.
Test Driven Development can easily be compiled in 4 easy steps –
If you have worked with ReactJS, then you probably know that code grows really fast in ReactJS. The code gets filled up with a lot of complex conditions caused due to service calls and change of state.
Every component of your React application that lacks unit tests become a legacy code which is very difficult to maintain. Although we can add unit test after we create the production code but it will be very risky as some scenarios can get overlooked which will cause the issue at the production stage.
The most important thing to do first is to set up the environment for writing and running our tests.
We need testing frameworks like Jest and Enzyme for implementing our test codes.
For this tutorial, we are using the following versions –
Jest is an open-source testing framework created by Facebook. Jest offers the best integration with ReactJS including a command line tool for test execution.
Jest offers a set of matchers which makes assertions easy to read and allows us to create mock functions with zero configuration.
Jest also offers “snapshot testing” to verify the component rendering result.
For unit testing with Jest, first, install Jest using the following command –
After installing Jest, add the following lines to your package.json file –
Enzyme is also an open-source testing framework which is maintained by Airbnb. It is easier to assert, manipulate and traverse React components in Enzyme.
You can use any of the testing frameworks but it is generally better to go with Jest as it offers all the required tools for unit testing and it is being used by Facebook in all its javascript codes.
For unit testing with Enzyme, first, install Enzyme using the following command –
To render react components and to retrieve specific nodes, you need to focus on Enzyme API. There are three ways to render a react component –
Shallow rendering is used to ensure that your tests aren’t asserting on the behavior of child components and is also useful to constrain yourself from testing a component as a unit.
Import
Full rendering or Full DOM rendering is best for use cases that require interaction between components and DOM APIs. Full rendering is also useful in use cases where the test components are wrapped in higher order components.
For Full rendering, it is required that the full DOM API is available at global scope. So you need a browser environment to run Full DOM rendering.
If you do not want to run the test inside a browser you can use jsdom library which is a headless browser implemented in JavaScript.
As in full rendering, components are actually mounted in the DOM, which means they can affect each other (if they are using the same DOM)
Import
Static rendering uses render function to generate HTML from React tree.
render function returns the similar output when compared with other Enzyme rendering methods such as shallow and mount but it uses a third-party library Cheerio for parsing and traversing HTML.
Import
Creating a React.js component using TDD
The very first step is to create a failing test which will try to render the ReactJS component using shallow rendering –
So when you run the test, you will get the following error –
ReferenceError: ComponentName is not defined.
After creating the failing test, we will create the ReactJS component using the basic syntax which will make the test pass –
Next, we need to make sure that our ReactJS component renders a predefined UI layout using the Jest toMatchSnapshot function.
Jest will automatically create a snapshot file [myTestFileName].snap under __snapshots__ folder. This file basically represents the UI layout we are expecting from the rendering of our ReactJS component.
However, as we are trying to implement a pure Test Driven Development (TDD), we first need to create the file and then call the toMatchSnapshot function.
This doesn’t mean that executing toMatchSnapshot function first and then seeing the results in the snapshot file is not a valid option.
However, to execute a pure TDD, we need to learn the structuring in snapshot files.
So first, we create the ComponentName.test.js.snap file –
After this, we create the unit test that will validate that the snapshot matches the component child elements.
Now we consider that components.getElements is the result of the render method.
Now we pass these elements to the expect method so that we can run the verification process against the snapshot file.
Once you execute the test, you will get the following error –
Received value does not match stored snapshot 1.
The above error states that the result from component.getElements does not match the snapshot. So we make this test pass –
The next step is to add functionality to input by executing a function when its value changes.
We first make changes to snapshot to make the test fail –
Jest will automatically sort the props or attributes in the expect function alphabetically before verifying it against the snapshot.
After test execution, we get the following error –
Now, to make this test pass, we will add an empty function to onChange.
We need to make sure that the component state changes after the onChange event are dispatched. To do this, we create a new unit test which will call the onChange function by passing an event.
Then we verify that the component state contains a key named input.
Now we get the following error –
Expected value to be defined, instead received undefined
So now we make the test pass by setting input in the component state
Now we need to make sure that the value is set in the new state. We will get this value from the event. So we create a test to make sure that the state contains this value –
Not surprisingly, we get the following error –
~~
Expected value to equal: “myValue”
Received: “”
Now we make this test pass by getting value from the event and setting it as the input value.
Now as all the tests have passed, we can now refactor our code –
From the above example, it may seem that many of the steps are unnecessary and you can skip them but to really execute Test Driven Development in its pure form, I will suggest you to avoid skipping any step.
Using a less strict TDD process is perfectly valid as it is a very difficult technique to master but it is definitely worth doing.
TDD technique must be adopted by every developer as it increases your productivity and also improves the code quality.
Applications developed using TDD technique are more modular and flexible.
Using Test-Driven Development (TDD) for ReactJS ensures code reliability, reduces bugs, and promotes modular and maintainable code. TDD encourages developers to write tests before implementing features, helping clarify requirements and catch errors early in the development process. This approach also fosters a culture of confidence in the codebase and supports continuous integration and deployment practices, ultimately leading to higher-quality ReactJS applications.
Test-Driven Development (TDD) is crucial because it ensures code reliability, reduces bugs, and promotes code clarity. By writing tests before writing implementation code, developers clarify requirements, establish a safety net for refactoring, and produce cleaner, more maintainable code. TDD also fosters a culture of confidence in the codebase and encourages iterative development practices, ultimately leading to higher-quality software products.
Test-Driven Development (TDD) is a software development approach where tests are written before the actual implementation code. Developers first create automated tests that define the desired behavior of a feature or function. Then, they write the minimum amount of code necessary to pass those tests. TDD promotes iterative development, code clarity, and ensures that software meets requirements and remains maintainable.

Are You Prepared for Digital Transformation?

Web Development Blog
Vue.js is a progressive JavaScript framework that is used to build the user interface of modern applications without using a lot of resources. Vue.js mainly focus on the view layer, which enables developers to integrate it into the existing projects without any hassle. Vue.js is a perfect choice for building single-page applications (SPA).

Web Development Blog
If you are a developer working in a team, then you must realize how difficult and frustrating it becomes when it comes to file sharing. No matter how hard you try for effective collaboration within the team but the fact is that the things become chaotic when there is no version control system.

Web Development Blog
n the world of web development, developing large-scale applications can be very challenging. The more complex the applications become, the more difficult it can be to maintain code consistency and scalability. MicroFrontends aims to solve this problem by breaking web applications into smaller, more manageable pieces.