- Running a single test independently
- Running multiple tests together as a test suite
- Running all available tests in one-go

For any Magento store owner, it has become very competitive to survive in the retail ecosystem. So it is very much important to do continuous monitoring of your market and make changes in your Magento website.
These changes allow companies to quickly respond to the changing retail ecosystem. But while making any changes to your eCommerce store, it becomes important to ensure smooth user experience.
To achieve this, a thorough Magento testing needs to be followed involving user behavior simulation for proper performance evaluation. If the changes are very frequent, then the old manual testing techniques become redundant. To overcome this scenario, Magento has introduced Magento Functional Testing Framework (MFTF).
Magento Functional Testing Framework (MFTF) was introduced by Tom Erskine at Mage Test Fest. MFTF has already seen 2 major releases and the latest version available till today is 2.3.12.
Before, getting to know about the MFTF (Magento functional Testing framework), we should be aware of the Functional Testing framework.
FTF is an open-source cross-platform solution where we can develop functional tests for a Magento application. These tests can be performed at any time with the options of –
Tests usually cover the functionality of a business entity. The goal is to find discrepancies between expected and real behavior of the entity.
Magento 2 offers a very complex architecture and it becomes very difficult to manually test everything. Also, manual testing can result in human mistakes due to complex flows.
Although unit testing and integration testing can cover the whole code but still don’t guarantee that everything will execute in the same way on different devices and browsers.
MFTF is a set of ready-made tests that check if a Magento 2 system functionality runs as expected. MFTF is based on selenium, codeception, allure, etc.
XML
MFTF tests are written in XML, so, you no longer need to learn PHP to write tests.
Merging
Merging is the most beneficial feature of MFTF. For example, we add a new field to the existing registration form of Magento website.
In the case of unit testing, we need to write test cases again for the complete page but in MFTF, we just need to provide extra attribute details and rest we can use the same test case code from the core.
PHP version
Upgrade your PHP version according to Magento instance which you are using. In our case, we will be using Magento 2.3, and our PHP version is 7.2.13
Composer
Install the composer on your environment. Please follow the below link to install composer.https://getcomposer.org/download/
Java
You need to install Java on your system to run the Selenium server.
Selenium server
Now install selenium jar file on your instance, which will help you to run MFTF test cases.
Download the jar file and place it in the Magento root directory or some server (depends upon your requirement). Please follow the below link for download –
https://www.seleniumhq.org/download/
You need browser driver (Mozilla, Chrome, Safari) to run your test cases. In our case, we are using the Google Chrome Driver. Follow the below link for download –
https://sites.google.com/a/chromium.org/chromedriver/downloads
I hope you are already aware of Magento 2 installation. But still, if you are new please refer to the following link for Magento 2 installation –
https://devdocs.magento.com/guides/v2.3/install-gde/install-quick-ref.html
You can also download the Magento 2.3 from here and just extract it to your localhost directory. After that just hit the Magento directory on your browser and complete the Magento setup.
We need to install the MFTF. Please follow below command –
composer install -d dev/tests/acceptance/
In the Magento project root, run –
vendor/bin/mftf build:project
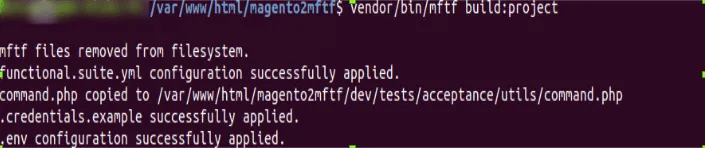
In the [Magento_Root]/dev/tests/acceptance/ directory, edit the .env file to match your system.
vim dev/tests/acceptance/.env
Specify the following parameters, which are required for tests –
In the [Magento_Root]/dev/tests/acceptance directory, run the following command to enable the MFTF to send Magento CLI commands to your Magento instance.
cp dev/tests/acceptance/.htaccess.sample dev/tests/acceptance/.htaccess
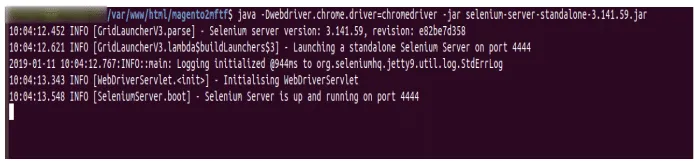
To run tests, you need a running Selenium server and mftf commands.
Run the Selenium server in another terminal
Run the Selenium server in the terminal. Both selenium jar file and browser driver should be on the same place. In our case, both reside in the Magento root directory.
For example, the following commands run the Selenium server for Google Chrome –
cd <path_to_directory_with_selenium_server_and_webdriver>/Java -Dwebdriver.chrome.driver=chromedriver -jar selenium-server-standalone-3.14.0.jar
Generate the tests
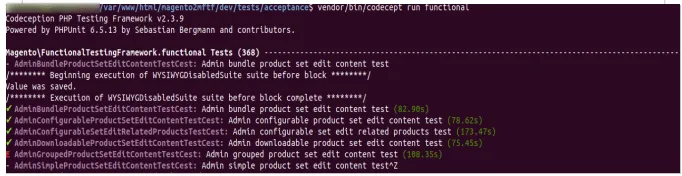
If you want to run complete test cases you need to run below command
vendor/bin/codecept run functional

Using vendor/bin/mftf you can run specified group (vendor/bin/mftf run:group product),
To run particular tests
vendor/bin/mftf run:test LoginAsAdminTest
To run previously failed test
vendor/bin/mftf run:failed
Run all generated Magento tests
In the dev/test/acceptance run below command to run all test cases
vendor/bin/mftf run functional
During testing, the MFTF generates test reports in CLI. You can generate visual representations of the report data using Allure Framework.
Install Allure
We will install allure using npm. First, install npm if it is not available on your system using the following command –
sudo apt install npm
npm install -g allure-commandline –save-dev
Run Allure to check Report –
We need below command to check test result report in allure –
allure serve dev/tests/_output/allure-results/

We have created one module with a form on the frontend and we named it Seller Create Form. We will write MFTF test cases for this form –
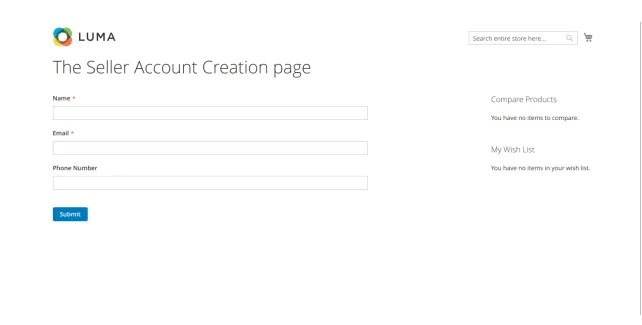
/app/code///Test/Mftf/ is the directory to create new tests.
Custom Module MFTF have 6 folder structure –
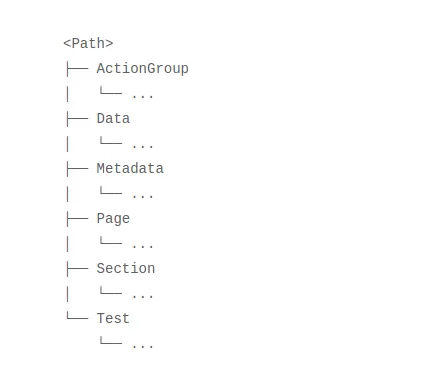
We will put our test cases in this folder. The test cases are nothing but simple XML files each file can contain multiple tests or a single test.
Convention says that you should put one test in each file and file name and test name must be the same and the name should follow camel casing.
MFTF is considered a sequence of actions with associated parameters.
Inside page folder, we can define pages that will be visited during test case execution. The naming convention of file name and page name must be the same, and the name will be following camel casing and all the names must end with “Page” suffix.
A
An action group is the group of actions (like click on the button, page load etc.). It is very useful to create a group of actions for better reusability, like LoginToStorefrontActionGroup,
SignUpNewUserFromStorefrontActionGroup in the customer test module. In many test cases, it must require the customer to login or register.
Any test case will need some dummy data for completing the test case, like dummy data for a product to test product create flow, dummy data for the customer to test registration and login feature. All the data XML files must end with data suffix.
While executing test cases sometimes tester might need some data entities to be created at runtime and used in the test or delete all the created data after the test is complete. This can be done using metadata. You can create operations like create, delete, update, get.
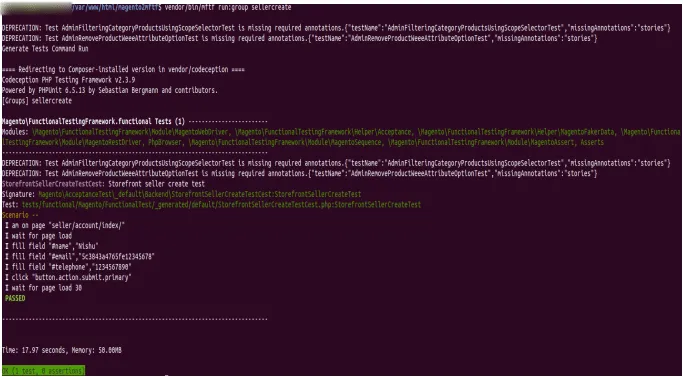
After creating, our own MFTF test cases for a custom module, we need to run generate command so that Magento will consider our test cases as well with their own default cases.
In the Magento root directory, run the below command –
vendor/bin/mftf generate:tests

After this, we will run our test cases with the help of our group id (mentioned in Action Group File)
vendor/bin/mftf run:group sellercreate
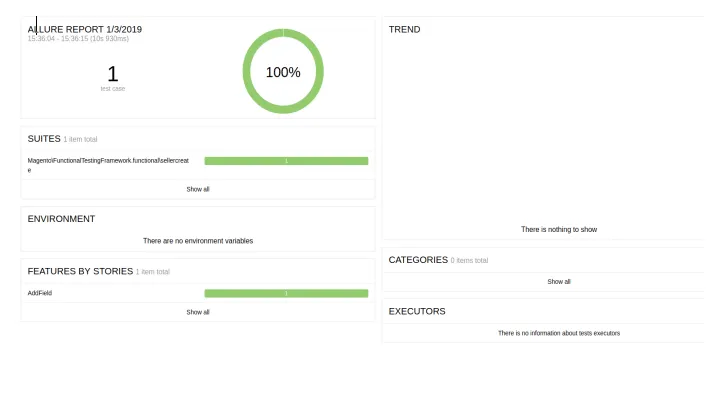
Now, if we want to check allure report for the same, run below command –
allure serve dev/tests/_output/allure-results/
Magento MFTF enables us to test user interactions with web applications. It helps developers/testers in automating regression testing.
Hope the above example, could have added some idea about the new functional testing framework and how it manages everything with XML files and the relation between them.
If you have any doubts, please feel free to comment.
We are an award-winning Magento web development company offering the expertise and skill set of Magento 2 Certified Associate Developer, Magento 2 Certified Professional Front End Developer, Magento Certified Developers©, Magento Certified Developers Plus© and Magento Certified Solution Specialists© under one roof.
Our Magento development services offer –
Our certified Magento development experts offer fully-featured B2B and B2C eCommerce stores with the best design. We have certified Magento 2 Front End Developer who will keep in mind your brand identity and your target audience while working on your Magento store.
Our certified Magento development experts offer fully-featured B2B and B2C eCommerce stores with the best design. We have certified Magento 2 Front End Developer who will keep in mind your brand identity and your target audience while working on your Magento store.
We offer Magento integration services with leading ERP/CRM solutions including SAP, Microsoft Dynamics, Open ERP, QuickBooks, Amazon, eBay, etc. We offer both pre-built integrations and custom integration solutions.
We offer custom Magento extension development to make your Magento store feature-rich.
The Magento Functional Testing Framework (MFTF) is an open-source tool designed to automate the testing of Magento applications. It enables developers to create and run functional tests, ensuring that the core functionalities of a Magento store operate correctly after updates or changes. MFTF uses a combination of XML test definitions and Selenium WebDriver, providing a robust and scalable solution for maintaining the quality and reliability of Magento-based eCommerce sites.
Our team at VT Netzwelt specializes in leveraging the Magento Functional Testing Framework (MFTF) to ensure seamless functionality and performance of your e-commerce site. With expertise in customizations, extensions, and optimizations, we deliver tailored solutions to meet your business needs efficiently.
The Functional Testing Framework (FTF) is a comprehensive software testing tool designed to validate the functionality of an application by executing test cases against its functional requirements. FTF automates the testing process, allowing for the efficient identification of bugs, errors, and inconsistencies in the application’s behavior. By simulating user interactions and inputs, FTF ensures that the software meets the specified functional requirements and delivers a reliable and consistent user experience.
Functional testing is essential to ensure that an application operates according to its specified requirements and performs its intended functions correctly. It helps identify and rectify defects, ensuring that the software delivers a reliable and consistent user experience. Additionally, functional testing verifies that all features work as expected, reducing the risk of failures in a production environment.
Are You Prepared for Digital Transformation?
Adobe Commerce Development
A practical guide to Magento 2 ERP integration for growing brands. Compare connectors, middleware, and custom builds. See real results from our Oracle ERP project.

Magento Development
Get insights into Magento migration pricing in 2026 for US retailers, covering customization, integrations, and project complexity.

eCommerce
Slow Magento store killing sales? See how Hyvä theme boosts speed, Core Web Vitals, and conversions in this guide.